Introduction
The border-collapse property is an essential CSS tool that allows you to control how the borders of HTML table cells are displayed. It determines whether the borders of adjacent cells merge into a single line or remain as separate entities. Understanding how to use this property effectively can help you create visually appealing and well-organized tables, enhancing the presentation of tabular data on your website.
Tables are often used to present data in a structured way, making it easy for users to understand information at a glance. For example, tables are commonly used in financial reports, product inventory lists, scheduling data, or statistical summaries to present data clearly and concisely. However, without proper styling, tables can look cluttered and unprofessional. This is where the border-collapse property comes into play, allowing developers to refine the appearance of table borders and create a cleaner, more streamlined design.
In this guide, we'll delve into the details of the border-collapse property, how to apply it, and when to choose between its main values: collapse and separate. Mastering this CSS feature can significantly improve the readability and visual appeal of your tables. This is crucial for enhancing user experience and maintaining a professional web design.
The border-collapse property is particularly useful for ensuring that table borders do not appear redundant or overly complex. As web developers aim for consistency and aesthetic quality, understanding how to use border-collapse in combination with other CSS properties can help maintain professional-looking table designs. Additionally, effectively using border-collapse can make a significant difference in how data is conveyed, especially in more complex projects where clarity is essential. Knowing how to leverage this property means you can ensure that users have an optimal experience when viewing complex datasets, such as quarterly reports, pricing tables, and educational data.
What is the border-collapse Property?
The border-collapse property in CSS specifies how table cell borders should be handled. It allows you to determine whether the borders of neighboring cells should be combined into a single border (collapse) or kept separate (separate). This choice greatly affects the look and style of your tables.
When using tables for presenting data, the borders play an important role in defining the structure of the information. Depending on how you want the data to be interpreted, you might prefer a compact, single-border appearance or a more spacious, separated look. Here’s a quick breakdown of its two primary values:
Collapse: When border-collapse is set to collapse, the borders between table cells are merged into a single border. This creates a more cohesive and organized look for your tables, which is ideal for presenting data in a simple and professional manner. Collapsing borders makes the table appear more unified, reducing visual noise and helping users focus on the content. The collapse value also makes maintenance easier since there are fewer individual borders to style or manage, which can be especially beneficial in complex data sets that require frequent updates.
Separate: When border-collapse is set to separate, each table cell keeps its individual borders, and you can use the border-spacing property to add extra space between cells. This results in a more open and distinct appearance, useful for emphasizing differences between sections of data or giving the table a more decorative, spacious feel. This value is particularly advantageous when you need to clearly differentiate between separate data categories, which can help make the information more comprehensible to viewers.
By default, most browsers apply the separate value to tables, which means each cell retains its individual borders unless you specify otherwise by setting border-collapse to collapse.
Syntax and Example Usage
To use the border-collapse property, simply add it to your CSS style for the table element. Here’s a basic example:
<style>
 table {
   width: 80%;
   border: 2px solid #333;
   border-collapse: collapse;
 }
 th, td {
   border: 1px solid #666;
   padding: 10px;
   text-align: center;
 }
</style>
<table>
 <tr>
   <th>Product</th>
   <th>Quantity</th>
   <th>Price</th>
 </tr>
 <tr>
   <td>Apples</td>
   <td>10</td>
   <td>$5.00</td>
 </tr>
 <tr>
   <td>Oranges</td>
   <td>5</td>
   <td>$3.50</td>
 </tr>
</table>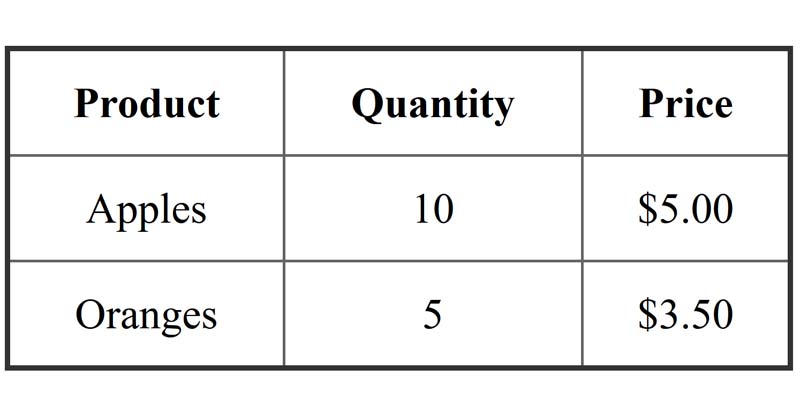
In this example, the border-collapse: collapse; property is applied to the table. As a result, the adjacent borders are combined into a single line, making the table look more cohesive and organized.
By merging borders, the collapse value helps to reduce visual clutter, which is especially beneficial when displaying a large amount of data. A well-organized table can help users focus on the information rather than being distracted by redundant borders.
The collapse value also simplifies the visual structure of the table, making it ideal for data-heavy presentations where the clarity of information is crucial, such as a quarterly financial summary, large dataset comparison, or scientific research tables. Using collapsed borders can prevent the visual mess that might occur with overlapping borders, especially in large tables with many rows and columns.
Differences Between border-collapse: collapse and border-collapse: separate
To fully appreciate the functionality of border-collapse, it's important to understand the visual impact of using collapse versus separate.
Collapsed Borders Example
<style>
 table {
   border-collapse: collapse;
   width: 100%;
 }
 th, td {
   border: 1px solid #000;
   padding: 8px;
 }
</style>
<table>
 <tr>
   <th>Item</th>
   <th>Quantity</th>
   <th>Price</th>
 </tr>
 <tr>
   <td>Bananas</td>
   <td>8</td>
   <td>$4.00</td>
 </tr>
</table>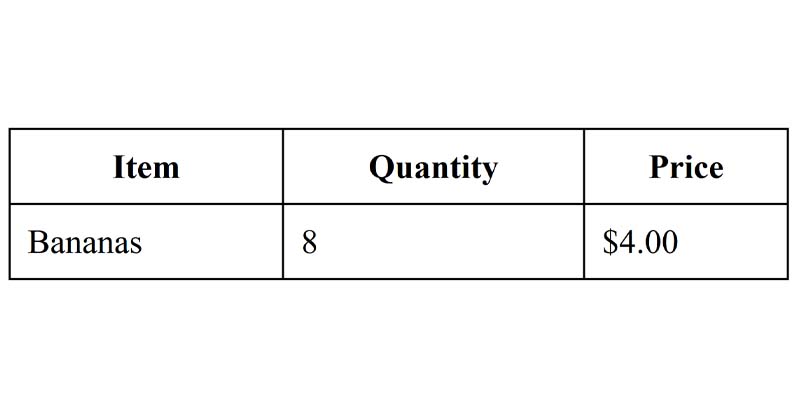
With border-collapse: collapse, the table has a compact look with a single shared border between neighboring cells. This approach is particularly effective when you want a streamlined, unified table design.
The collapsed borders give a sense of unity, making it easier for users to understand the relationship between different data points. This is particularly helpful in scenarios where the data needs to be viewed as a whole, such as in financial reports, business intelligence dashboards, or comparison tables with key metrics.
Collapsed borders can also make the table look more professional, which is crucial in environments like business dashboards, academic publications, or professional presentations where the data must be presented with a clear emphasis on structure and cohesion.
Separate Borders Example
<style>
 table {
   border-collapse: separate;
   border-spacing: 10px;
 }
 th, td {
   border: 1px solid #000;
   padding: 8px;
 }
</style>
<table>
 <tr>
   <th>Item</th>
   <th>Quantity</th>
   <th>Price</th>
 </tr>
 <tr>
   <td>Bananas</td>
   <td>8</td>
   <td>$4.00</td>
 </tr>
</table>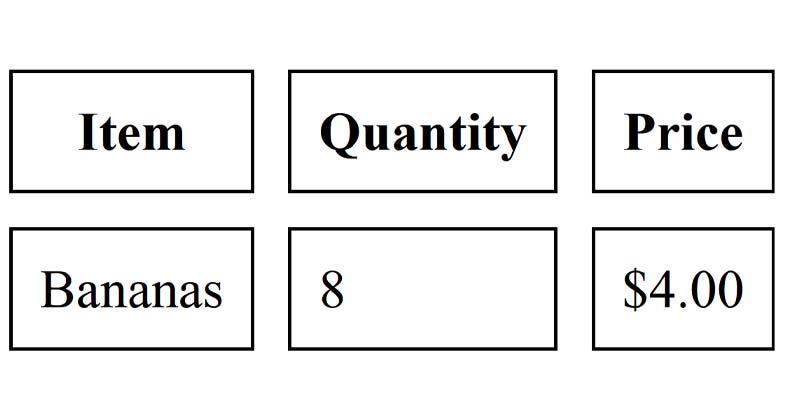
In this case, each cell retains its individual borders, and the border-spacing property adds space between cells, resulting in a more open and less compact look. This style is ideal if you want to emphasize separation between different cells or data groups.
Using border-collapse: separate can be particularly useful when dealing with tables that include multiple categories or different types of data. The added spacing helps to visually distinguish each category, making it easier for users to identify different sections.
The separate value is particularly advantageous in tables where there is a need to convey clear segmentation. For example, if you are designing a product comparison table, having separate borders with additional spacing can help delineate the different features of each product, making the data easier to analyze. Similarly, in a classroom setting, separate borders can help students differentiate between various subjects or types of information, improving their comprehension.
When Should You Use border-collapse?
Choosing the right value for border-collapse depends on the type of table and the context in which it will be used. Here are some scenarios to consider:
When Simplicity is Important: If you want your table to appear clean, compact, and organized, use border-collapse: collapse;. It is especially useful for presenting data in a professional context where clarity and conciseness are crucial, such as financial reports, inventory lists, or data dashboards. Collapsed borders can provide a cleaner, more streamlined presentation that facilitates quick decision-making.
For Improved Readability: When you want to make the data easier to read by minimizing visual clutter, collapsed borders provide a more unified appearance without unnecessary lines between cells. This is helpful in scenarios where data needs to be reviewed quickly and efficiently, such as in managerial reports, academic research tables, or online analytical tools that require a user-friendly interface for data interpretation.
To Customize Spacing: If you need more space between table cells for aesthetic or readability purposes, border-collapse: separate; allows you to control the distance between cells using the border-spacing property. This is beneficial when you want to make different groups of data visually distinct or when you need to create more whitespace for better user experience. For instance, separate borders can add visual clarity when working with complex forms, multi-category comparisons, or educational content designed to highlight differences between topics.
Tables with separate borders are also useful for highlighting key data points, especially when designing interfaces where users must compare and contrast different types of information. For example, in educational contexts, separate borders might be used to make it easier for students to differentiate between various categories of data, helping them better retain the information.
Best Practices for Using border-collapse
Maintain Consistent Styling: Consistency in table design is key to a professional look. Ensure that you use the border-collapse property consistently throughout your website to maintain visual harmony and improve user experience. A consistent approach also helps users navigate the information more intuitively, reducing confusion and increasing the overall effectiveness of your data presentation.
Combine with Other CSS Properties: Use border-collapse alongside other CSS properties like padding, border-spacing, text-align, and background-color to create tables that are both functional and aesthetically pleasing. For example, padding improves the spacing within cells, making the content easier to read, while border-spacing controls the distance between cells to enhance visual structure. Text-align ensures the content is aligned properly, and background-color adds visual distinction, making the data more engaging and easier to interpret. These properties work together to enhance the table’s overall appearance and improve readability. Experimenting with different combinations can help achieve a unique and visually effective style that aligns with your website's design theme.
Avoid Overlapping Borders: When borders are not collapsed, you may end up with overlapping borders, which can make the table look cluttered and unappealing. Use border-collapse: collapse; to prevent this, ensuring that each cell shares borders with its neighbors for a cleaner look. Overlapping borders can be especially problematic in tables with many rows, as the multiple border lines can become visually overwhelming for users.
Experiment with Border Spacing: When using border-collapse: separate, don't be afraid to experiment with different values for border-spacing. This can add a creative element to your tables, helping to enhance the visual structure of the data. By adjusting the spacing, you can create a more distinctive appearance that matches your website’s theme. For instance, larger border spacing may be effective for creating a more open and accessible layout, especially for tables used in educational or instructional content. This can improve the user experience by providing enough space for better readability and a less cluttered view.
Consider the User Experience: Always keep the user experience in mind when choosing between collapse and separate. Collapsed borders are generally easier on the eyes when users need to scan data quickly, whereas separate borders can make individual data points stand out more clearly. Depending on the type of information you are presenting, choose the value that will make it easiest for users to absorb the content. For example, if the goal is to present data in a dense, easy-to-digest format, collapsed borders are likely the best choice. On the other hand, if the goal is to emphasize individual differences, such as comparing multiple products or services, separate borders will provide better visual separation.
Conclusion
The border-collapse property is a valuable tool for creating well-structured and visually appealing HTML tables. Whether you choose to collapse or separate borders depends on your design requirements and the context in which the table is used. By using border-collapse effectively, you can significantly improve the clarity, professionalism, and overall user experience of your tables.
Incorporating this property into your CSS toolkit will enable you to make more deliberate design decisions, ensuring your tables are both functional and visually appealing. Use border-collapse wisely to make your data presentation cleaner, more organized, and accessible to your users, helping them better understand and engage with the information you provide.
